
The Idea: Exploring the ruins of an almost fully submerged civilisation and the discovery of a portal to an underwater city
The place looks like its being taken care of but eventually it's going to go below water level anyway.
This is my initial environmental mood board. I wanted my design to look like it was underwater. It was supposed to be an underwater cave with a pathway that goes downward from the top. I imagined the portal being surrounded by ruins on the way down from the top.

This is my final moodboard. I decided to not make the scene underwater and I chose to make a hollow cave above water with holes poking through the cave walls to allow sunlight through. Then chose to put the portal outside. The idea was that the cave would be full of vegetation that show signs of ruins showcasing an old portal room that leads to an underwater city. Exploring more till you reach the outside of the cave to the island across a new portal area has been made and maintained by ocean-dwellers; and a new portal can be accessed that leads to the underwater city.

This is a to do list that I've created for myself to keep myself in check for all the tasks that I have to do.

This is a sketch that I did to help me visualise the pathways of my environment.


For texturing most of the ruins. I used the "Marble veined" and covered the models with moisture and faint traces of sand.
For this bridge, I stamped a wave pattern in gold and gave it a bit of height because I wanted it to stand out. To add to the oceanic-feel.
Texturing the fish was a bit difficult when I had to draw the scales. I wasn't sure whether to take it into Zbrush or not and I tried to find a bunch of scale pngs to import here as a height map. I couldn't find any good ones so I just drew my own in procreate and imported it in.
As mentioned before. the fish uses the "Marble veined", moisture and sand details too.
This 3D model was so fun to texture. I used a trident image as reference to engrave it into the middle of the floor and I used a medieval-styled stamp to get the pattern circling around it.
Initially, I wanted to make the dome see through but I decided to just add the "Quartz Acrylic Polymer" material on it and made it glossy so that it'd shine under the sun. The dome is one of the areas that haven't been affected fully by the increasing water level so I only added minor traces of sand and moisture near the floor of the building.
I got a bit confused at the baking part of this but thankfully it worked in the end. The file keeps acting up so the swirls aren't there right now but it's visible in UE. I also noticed that substance painter added a bevel on the top of the column which I found weird cause I didn't add any edges on it in Maya. I decided to just leave it because it looked kind of nice anyway and can't be seen in my scene half the time.
This was a quick plane that I coloured to follow the water animation tutorial. I was going to make a waterfall but I realised that If I added some in my scene it wouldn't make sense because if I did there's no visible water source anyway so it would be uneccessary.
This was an easy 3D model to texture because it used the same materials I used for the other ruins: "Marble veined", moisture, sand stamps with gold to line the stairs. I played around with roughness and metallic to make it shiny. Then I used the trident reference from Pinterest and a circle bevel to decorate the mini staircase which I don't think I ended up using in the end.


Column | Process
To create my column I took inspiration from Ancient Greek Architecture; wanting to make a twisted column for supports and decoration for the ruins.
It was difficult to find a specific video covering what I wanted to make so I resulted in this video that I found: https://www.youtube.com/watch?v=T7lVqxvYg9U
It covers how to make a twisted rope which I did here on the left. I messed around with the divisions to make sure that it didn't have too much edges and vertices.
I also decided to delete some edges later on. Deleting every second one down the column.
Then I added detail by adding more edge loops on the top and bottom platforms. I also 3D modelled that distinguishable slab that has the curled wave pattern on it that is seen in Ancient Greek Architecture.
Image via Pinterest Ancient Greek Columns
I ended up not using it in the end because the mesh didn't load properly in Unreal and the textures didn't apply properly either.

Dome Building | Process


Trident and Fish Statue | Process


To create my dome, for the portal room, and many of the other 3D models I made, I took inspiration from Ancient Greece.
My workflow here was make the support ring of the dome a torus and lessened the faces. Then I grabbed a sphere and deleted half of it to create the dome shape.
Looking to the left, there's a brief overview of what my UV's looked like altogether. I decided to combine the trident in this one because I used my trident model on the top of the dome and I wanted the dome and the trident to have the same material to lessen the amount of materials I would have for time efficiency.
Creating the fish was difficult. I wanted to work in ZBrush and tried to 3D model a sphere to shape it into the image that I used for reference but it just did not work.
In the end I found that using a plane and Orthographic 3D modelling it and extruding the fish out worked best. So that's what I did.
I was also planning to create another statue at the time; a fish statue on the wall curling around a trident. But, again, it was difficult to find a tutorial for that so I chose to jus make one statue in the end to add to the ruins and anywhere else to hint that the portal would be leading to an underwater environment.
For my trident, I had trouble uv unwrapping it but in the end I made it work. I also used the orthographic 3D modelling method to create the forks and jus used a cylinder for the pole.
I decided to UV unwrap my fish by itself and not include the trident with it because I learned from last year that the bigger your UV is the less pixelated your texture will be. I also created a platform for the fish using a cylinder.

Staircase | Process
This is a staircase that I had to re-evaluate the UV about because the squares weren't even.

Video used to make stairs in maya: https://www.youtube.com/watch?v=g7bbWPhwd-o

My final UV layout for all the staircases.

Bridge | Process
This model was the easiest I made, it was just a cube that I added edges too to give more dimension and to make texturing easier later to give the Ancient Greece architecture vibe.

Portals and Arch | Process
To create the portal and the arch, I just used a torus for both and changed the amount of subdivisions for each. The arch was just a split torus.

Here I decided to try the high poly baking method for my column. To reduce the amount of polygons I had in my polygon count. I also did this method so I could use it in the future.
I basically just exported a low poly FBX and a high poly FBX separately, brought the low poly FBX into substance painter and baked the high poly FBX on it. As advised by my lecturer.
I started to add camera in once the foliage was done. My idea for my camera sequence is to start it off slowly, exploring little parts of the cave in the POV of an explorer eventually making their way to the portal.
My final sequence. Something that didn't get included was the portal model rotating because the pivot point was acting up.
My render settings.
I grabbed this free stock image from Adobe of a city that glows like as if it was underwater.
What the portal looked like in the end. To make this portal I followed a tutorial on youtube: https://www.youtube.com/watch?v=FHM6EOmOZkw
To follow the tutotial it required a circle plane and a image. It was pretty straightforward and I stopped watching it before he implemented the Niagara system to animate it more.
Apparently, I was setting up the AmbientOcclusionRoughnessMetallic texture map wrong. So I had to fix it for all my models.
An example of my models with the texture properly applied.
I enabled wind for the plants and used foliage and Quixel Bridge to make landscape pretty.
Video: https://www.youtube.com/watch?v=0l8f3uxNmcU
The plant I picked were mostly beach grass, any bushes with big leaves and vines. I also chucked in some Lily of the Valley flowers in the end too.
My graphics changed when I opened up my scene on a Uni computer.

GREYBOX
This was my grey box. The only thing I changed was the giant circular room, I changed it into a dome building settled on an island which can be accessed by going on the bridge that starts from the hollow cave.

Since I was new to UE, I had trouble with my 3D models because they would always disappear when I reloaded my scene and it was because "Enable streaming" was selected.

Landscaping
This was a failed landscape I sculpted in Maya that I didn't use. I did all my landscape sculpting in UE.

To make this: I grabbed a sphere, and used booleans to make it cut in hald and make it hollow. Then I used the model sculpting function in UE to make it rocky.


Booleans again to cut the holes into the cave walls.

Blueprint: Materials
I had to make a landscape material in order to paint on my landscape. This video was used to make it: https://www.youtube.com/watch?v=3zy5oMXuO04&pp=ygUXbGFuZHNjYXBlIHNjdWxwdGluZyB1ZTU%3D

Video I used to animate a water plane: https://www.youtube.com/watch?v=jo7MXufS_fU&pp=ygUlVUU0IHNpbXBsZSB3YXRlcmZsbCBtYXRlcmlhbCB0dXRvcmlhbA%3D%3D

Evidence of the material graph I made following this tutorial. I used my own texture that I made on substance painter though. I made some changes for my final water material though. I had to slow down the water speed and change the mateial from translucent to opaque because when the cameras went too close to the water, it'd disappear completely.


This is evidence of me learning how to link nodes in the material graph.

Environment: Importing 3D Models in it
I had to split some of my models and re-merge them because some actors needed to be separated like the trident from the dome building.

Lighting
Initial lighting that I didn't use because although it made the buildings outside look nice, nothing in the cave could be seen because the sun is setting in this scene and if I wanted the sun to stream into the cave to provide sun rays, I would need the sun above the cave.

OPTION #1

OPTION #2

Environment part 2
I had a lot of fun painting the landscape using the materials I picked from Quixel Bridge. I wanted the ground to be grassy or mossy and the cave walls to have vines so I painted that. The outside, I wanted the rocks to be sharp so I chose a surface for that.

A picture showcasing my water before I changed the texture.

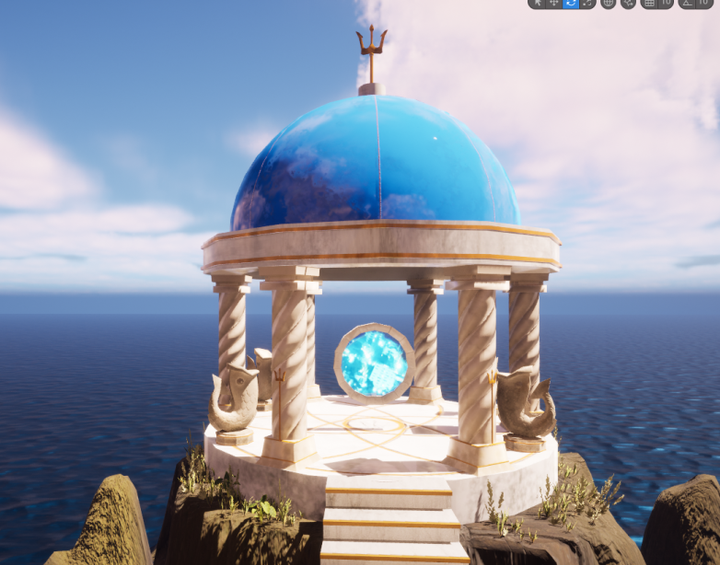
What my scene looked like when I added sunrays and my models.

My final scene for the cave.

Sequencer


Portal Animation


Adding foliage


My final sequence
Environmental Design | Self Reflection
This project has been one of my favourites so far. I had the opportunity to fine-tune my 3D modelling, UV unwrapping, analysis writing, editing and learn Unreal Engine for the first time. Personally, I enjoy 3D modelling so I just had fun 3D modelling all my assets. Except for the fish. This time around I did well in terms of time management and efficiency. My task list really helped a lot.
The parts of this project that I found the most time consuming was grey boxing and visualising the environment that I wanted to create. Initially, It went from making an underwater city, to making a very linear portal room that is accessed through an underwater passage way, to a mermaid cove until finally my final idea which still had a portal included except this time ancient ruins and islands were added into the mixture. T
Using Unreal Engine in the beginning was a nightmare. I think i'll be a lot better next time because now I know not to enable streaming cause it hides all your actors when you reopen your file on UE. I wasted a bit of time remaking my greybox thinking it disappeared. I enjoyed using the foliage function a lot. Decorating my scene with different types of flora and vines added so much more life to the environment because I picked such an organic scene. Navigating in the blueprint also known as the material graphs was a bit of a hassle especially when I was following tutorials to create a material for my water and the portal effects and animation. Next time, if I were to use UE again, I'm just going to use the water that UE already has instead of animating my own. Although the water I made did have some seams, it's not super noticeable and I liked the wave texture I made because it made the water look like it was moving a lot more. I also think that i'm going to pre-scale my assets before importing them in because a lot of my assets scales were over 100 but some were fine.
If I have time in the future, I'd like to revisit this project and add more to the environment like more traces of ruins scattered around the main one but I kind of like how it's the last island left about to be submerged underwater so I might explore making the underwater city in the future.
I think using old assets, like the bush I made in "Lost Fragments" the 2.5D platformer from last year was super useful when making the foliage more dynamic. The foliage really added the ancient feeling that I wanted to accomplish when the viewer sees my scene. I was super proud of the lighting and was glad that the sun rays peeked through into the cave and made the ruins glow.
Editing was super quick and fortunately, I didn't need to handbrake my sequence. Although, I did have to render it multiple times because there was a glitch in visible in the sequence when it got converted from an AVI file to an MP4 file.
Writing the analysis was super confusing because we didn't get given a structure on how to write our analysis, so I just did the best I could and wrote enough about how Fontaine's underwater environments are immersive and different through Mihoyo's underwater gameplay and environments and how it did not create an imbalance in the game. It would be nice to have a structure for our analysis next time if we ever have to write one again.
Overall, if I were to choose between Unity and Unreal Engine. I think i'd still prefer Unity but I don't mind exploring Unreal Engine more in the future. I also really liked this assignment and think I picked a good idea in the end to follow without overwhelming myself.

I took the AVI file that UE exported out and I took it into Premiere Pro to add ocean waves audio and any other cave music I could find to add to the ambience that the area is isolated.
Audio Credits
S: Natural Ocean Waves, Water Droplets & Bubbly Sounds by DudeAwesome | License: Attribution 4.0
S: Summer Waves at Charmouth Beach in Dorset by konakaboom | License: Attribution NonCommercial 4.0

I realised that I didn't have to handbrake this because my sequence was under 500MB so it was okay for submission.
Landscape Materials
IBelow are the surfaces I downloaded from Quixel Bridge to paint my landscape. I made sure to get a surface with vines on it because I wanted the cave walls to have wines. The rocks are for the island and the moss is to add age to the scene.


Plants
Below are the materials I downloaded from Quixel Bridge to add plants into my scene. As mentioned before I wanted to make the cave look overgrown but the island much more maintained as if someone's been taking care of it before the whole island gets submerged. The only material that came from me is the first image below which is a bush I made last year.


Blueprint Materials
Below is a showcase of all my materials and their blueprint nodes and how I laid them out.


